Clicky Analytics Anti-Adblock tracking on CloudFront

If you have a website hosted on AWS S3/CloudFront and use Clicky for analytics, you might face issues with Adblockers and browsers blocking Clicky’s tracking code. To bypass this, Clicky offers an Adblock/Proxy solution, which involves proxying the tracking code through your own domain to disguise it.
Usually, this requires modifying the configuration of servers like Nginx, Apache, or Caddy. However, since our website is a static site hosted on AWS S3 behind CloudFront, we need a different solution.
Assumptions
- You have a website hosted on AWS S3 behind the CloudFront.
- You have a Clicky account for analytics.
Preparation
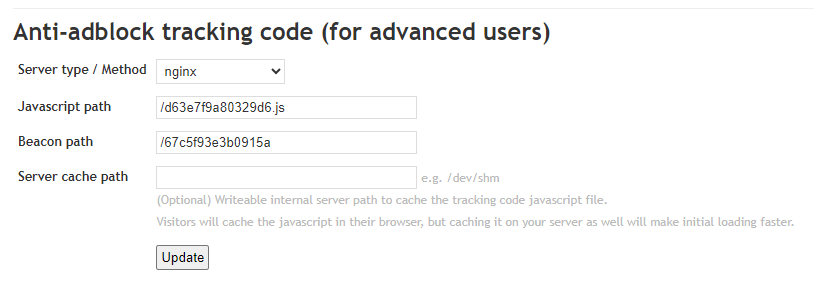
First, open the instructions on the Prefs » Tracking Code page. We are interested in the Anti-adblock tracking code (for advanced users) section. You will see the values for Javascript path and Beacon path that you need to use on your website.

Let’s configure reverse proxy from our website to Clicky servers. We will use the example for nginx as a guide.
http {
	server {
		### COPY THE CODE BELOW INTO YOUR WEBSITE'S EXISTING SERVER{} (VIRTUAL HOST) BLOCK
		### CLICKY ANTI-ADBLOCK PROXY - https://clicky.com/help/proxy

		# IMPORTANT NOTE: Incoming X-Forwarded-For headers are supported by default.
		# To disable this, replace all "$proxy_add_x_forwarded_for" references with "$remote_addr".

		# DNS RESOLVER - if already defined elsewhere, this can optionally be deleted.
		resolver 1.1.1.1;

		# COOKIES - override cookie header to just send the service-related first party cookies.
		set $cookie "";
		if ($cookie__cky_ignore) {
			set $cookie "_cky_ignore=$cookie__cky_ignore; _cky_osa=$cookie__cky_osa";
		}

		# JAVASCRIPT TRACKING CODE
		location = /d63e7f9a80329d6.js {
			proxy_pass https://static.getclicky.com/js?in=%2F67c5f93e3b0915a;
			proxy_connect_timeout 10s;
			proxy_http_version 1.1;
			proxy_ssl_server_name on;
			proxy_set_header Host static.getclicky.com;
			proxy_set_header X-Forwarded-For $proxy_add_x_forwarded_for;
			proxy_set_header Cookie "";
		}

		# JAVASCRIPT BEACON
		location = /67c5f93e3b0915a {
			proxy_pass https://in.getclicky.com/in.php;
			proxy_connect_timeout 10s;
			proxy_http_version 1.1;
			proxy_ssl_server_name on;
			proxy_set_header Host in.getclicky.com;
			proxy_set_header X-Forwarded-Proto $scheme;
			proxy_set_header X-Forwarded-Host  $host;
			proxy_set_header X-Forwarded-For   $proxy_add_x_forwarded_for;
			proxy_set_header Cookie $cookie;
		}

		### / CLICKY
	}
}
We are interested in the following:
proxy_pass https://static.getclicky.com/js?in=%2F67c5f93e3b0915a;- Javascript path.proxy_pass https://in.getclicky.com/in.php;- Beacon path.- All cookies except
_cky_ignoreand_cky_osaare filtered. - There are some manipulations with headers.
Solution
To begin, let’s create two new Origins in the settings of our CloudFront distribution:
- For
Javascript path:- Origin Domain Name:
static.getclicky.com - Protocol:
HTTPS Only - Minimum Origin SSL Protocol:
TLSv1.2
- Origin Domain Name:
- For
Beacon path:- Origin Domain Name:
in.getclicky.com - Protocol:
HTTPS Only - Minimum Origin SSL Protocol:
TLSv1.2
- Origin Domain Name:
Great, now we can use these Origins to configure the behavior of our CloudFront distribution.

Now let’s configure the behavior of our CloudFront distribution.
For Javascript path:
- Path Pattern:
/d63e7f9a80329d6.js(replace with yourJavascriptpath) - Origin or Origin Group:
static.getclicky.com - Viewer Protocol Policy:
HTTPS only - Allowed HTTP Methods:
GET, HEAD - Cache Policy:
Managed-CachingDisabled - Origin Request Policy:
Create a new Origin Request Policy- Name:
FastfoodCoding_Clicky_js(choose any convenient name) - Headers: All viewer headers except
Host - Cookies: Include the following cookies
_cky_ignore,_cky_osa - Query Strings:
All
- Name:
For Beacon path:
- Path Pattern:
/67c5f93e3b0915a(replace with yourBeaconpath) - Origin or Origin Group:
in.getclicky.com - Viewer Protocol Policy:
HTTPS only - Allowed HTTP Methods:
GET, HEAD, OPTIONS, PUT, POST, PATCH, DELETE - Cache Policy:
Managed-CachingDisabled - Origin Request Policy:
FastfoodCoding_Clicky_js(created in the previous step)
Wow, we have configured the behavior for our CloudFront distribution.

The last step remains - correctly construct paths to the Clicky servers. To do this, we’ll create a CloudFront Function that will trigger on Viewer Request. Choose Runtime: cloudfront-js-2.0 and write the following code:
function handler(event) {

    if (event.request.uri === '/d63e7f9a80329d6.js') {
        event.request.uri = '/js'
        event.request.querystring = 'in=%2F67c5f93e3b0915a'
    } else if (event.request.uri === '/67c5f93e3b0915a') {
        event.request.uri = '/in.php'
    }

    return event.request;
}
Now, for each request to /d63e7f9a80329d6.js, we will redirect to /js?in=%2F67c5f93e3b0915a, and for /67c5f93e3b0915a, to /in.php.
That’s it! All that’s left is to connect our CloudFront Function to the behaviors of our distribution, and you’re good to go. Just add the following code snippet to your site:
<script async data-id="101449625" src="/d63e7f9a80329d6.js"></script>Well done!